coreboot/SeaBIOS on the x201i for the win!
I just flashed my BIOS chip and most things work better than before, but also some don't (but I'm confident to be able to fix them).
But let's start from the beginning: Running FreeBSD on my x201i was always tied to a few disadvantages for me, namely:
- setting screen brightness worked, but not-intuitively (getting to brightest was setting the second-highest level)
- fan speed control was broken, couldn't get it to maximum speed (only 2 out of 7 speed levels had an effect)
- suspend to RAM (S3) didn't work correctly, machine woke up but screen stayed black
- out of 8GB of phsyically installed RAM, only 4 were accessible
None of the above was too annoying to get hung up on, so I mostly ignored them or didn't use them. However, the RAM issue was frustrating,
but I kinda gave up on that one because not even Windows seemed to make use of the full 8GB (so I started to believe
this is normal by reading comments that the graphics use part of it, etc.). I was already using the latest official BIOS
from Lenovo (this was 1.40-1.15, which is 16 months old), so the typical suggestion online and through Lenovo's support, to update the
BIOS, wasn't really helping. However, all of the above points surely feel like either directly BIOS, or ACPI-table related.
 So, what to do? Nothing,
I thought at first, as it's all a black-box and not open. Also, ACPI related things still confuse and
kinda scare me. However, playing around with a BusPirate lately and getting more and
more interested into running a (mostly) open BIOS replacement led me to dump the contents of my BIOS, building coreboot and reflashing it.
So, what to do? Nothing,
I thought at first, as it's all a black-box and not open. Also, ACPI related things still confuse and
kinda scare me. However, playing around with a BusPirate lately and getting more and
more interested into running a (mostly) open BIOS replacement led me to dump the contents of my BIOS, building coreboot and reflashing it.
Turns out that after flashing and starting up my laptop, it just worked fine, and even better:
- brightness adjustment works intuitively now
- I can adjust the fan speed using sysctl to all 7 levels (although it seems to spin faster at the lowest level than it did with Lenovo's BIOS)
- very low battery now warns with 3 short (and gentle) beeps
- suspend to RAM works now (although sometimes the screen is garbled and I need to restart X11)
- all 8GBs of RAM now show up as they should under sysctl's hw.{real,user,phys}mem states
What broke:
- already existing Windows installation: I run a dual-boot setup, and whereas FreeBSD booted just fine after flashing the BIOS, the Windows boot hangs after (or while) loading classpnp.sys; not too worried about it, as I very rarely boot into Windows, and maybe a reinstall will fix it, haven't looked into the details of the problem, yet.
- sometimes X11 doesn't fully come up but just displays a blank screen, a reboot seems to help; this actually does worry me a bit, and I'm currently looking into this
For reference, some notes about the actual BIOS dumping and reflashing:
I mostly followed the coreboot's lenovo/x201 instructions.
I went through quite a few unsuccessful BIOS dumps, trying shortening the wires, checked the contacts, etc.. Turns out that the only reliable
dump I made was by:
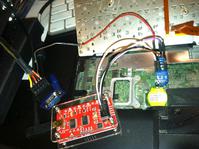
- using the 3.3V power line from a Desktop's power supply (the orange wire off of a SATA power plug, ground stays connected to the BusPirate), as the board seems to suck too much power than what the BusPirate can deliver from USB
- wires shorter than 10cm
 As the coreboot page suggests, long wires lead to faulty dumps with certainty. I tested 20cm long wires and got a dump with 95% of it being 0xff bytes.
I also tried several dumps (with short wires) by using the BusPirate's 3.3V pin, but never got a perfect dump out of it, I always had like 1-2% of wrongly read bytes.
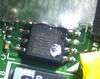
Additionally, good contacts - I went through 2 cheap SOIC clips before I got a Pomona which worked much better (also feels much better).
I'm sure that my first one would've worked at some point, but the plastic seems to be so soft, that after clipping it onto the chip a few times, it didn't
hold itself firmly on there, anymore. On the image to the right, note the red power-line attached to the Desktop's power supply (using a paper clip).
As the coreboot page suggests, long wires lead to faulty dumps with certainty. I tested 20cm long wires and got a dump with 95% of it being 0xff bytes.
I also tried several dumps (with short wires) by using the BusPirate's 3.3V pin, but never got a perfect dump out of it, I always had like 1-2% of wrongly read bytes.
Additionally, good contacts - I went through 2 cheap SOIC clips before I got a Pomona which worked much better (also feels much better).
I'm sure that my first one would've worked at some point, but the plastic seems to be so soft, that after clipping it onto the chip a few times, it didn't
hold itself firmly on there, anymore. On the image to the right, note the red power-line attached to the Desktop's power supply (using a paper clip).
Among the unsuccessful attempts of dumping the ROM was also having the laptop powering the chip and not attaching the 3.3V pin. On the flashrom page about
programming a flash chip that is still soldered to the board, page they refer to that by saying to keep the mainboard
in reset to avoid any SPI traffic. I wasn't able to do that, but used the BusPirate to sniff SPI traffic while the machine was sitting at a boot prompt that
doesn't have a timeout (so I was able to see that no SPI traffic happened, tested 5+ minutes). The sniffing worked fine, and I once it got to the prompt, no
SPI traffic seemed to happen anymore. However, once I tried to then read the BIOS, flashrom either didn't detect the chip (No EEPROM/flash device found.)
or detected it wrongly. Force-reading in the latter case resulted in a useless dump.
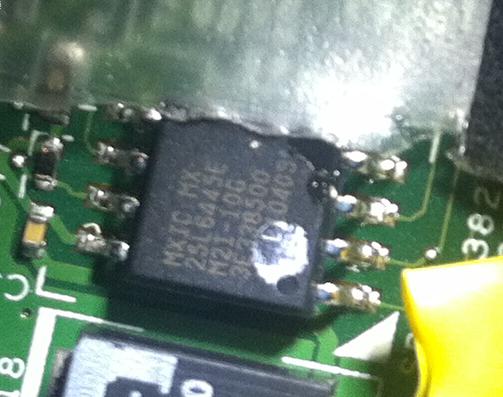
Anyways, a successful dump of that 8MB chip with the BusPirate took about 30 to 35 minutes for me. Once I got the dump, I followed the instructions on the
coreboot page to get the descriptor and management engine blobs. Also, extract the vgabios (optional, but advisable). To do that,
follow this (if the bios_extract tool doesn't work, use PhoenixTool to dump the oprom*.rom files).
Building coreboot then requires to configure it to point to the descriptor, the management engine (by de-selecting "fake IFD" and setting the path to the
management engine blob) and optionally, pointing it to the vgabios.
Although some sources online flash the resulting image onto the BIOS from the running laptop itself,
it failed for me. So I simply flashed the chip using the BusPirate again. Note that this will take a while, it first reads the flashchip again, then erase-writes,
potentially trying multiple different erase-techniques, then verifies the write. It took about 2h in my case.
So, all that's left that's proprietary is the descriptor, the management engine and the vgabios.